2012-12-09

Surfacing Big Boards without a Big Jointer


How do I surface a big board if I don't have a jointer? In this post, I'm going to show you one way to do it. There are many ways to skin this particular cat, but this way works, and the basic principles apply in lots of situations.


Getting some big boards surfaced is the first step in a project that will stretch out across several blog posts:

2012-11-29

Power Cord Replacement


In an earlier post, I pointed out that I needed to replace the power cord on my drill, which is a Milwaukee 3/8” “Hole Shooter” about 10 years old. I don't know if there's something special about the air here in Atlanta, but the outer insulation on power cables seems to degrade faster here than anywhere else I've lived. When you see that the outer layer of a power cord is cracking, it's time to replace it. No ifs, ands, or buts. Don't wait until the drill (router, sander, whatever) stops working - - - by that time it may start shorting out and tripping breakers, or in a really bad case, give you a nasty shock.

This is good advice for all woodworkers, but especially for those of us trying to equip a shop on a shoestring. If you hunt for tools at estate sales or pawn shops, you may come up with some real gems at bargain prices - - if you can settle for an “as is” deal. The power cord is definitely something to inspect before you fire up a used power tool for the first time. In fact, if you're the type who likes to negotiate the purchase price, pointing out frayed insulation and saying you'll have to replace the power cord might help you find out how low the seller's willing to go.

Whether it's a vintage jewel/old beater you've just purchased, or a tool you've had for years, when you look down and see this,


then it's time to install a new power cord.

2012-11-24

Thanksgiving


It's Thanksgiving weekend. Thanksgiving is my favorite holiday; I have developed some pleasant rituals for myself and enjoy cooking a big, delicious meal for my family. This autumn, I have been thinking about Everyman (the play they make all the English majors read during the first semester survey of British lit) and, one thing leading to another, my Thanksgiving ruminations focused on memory.

(So far this isn't about woodworking. I know. Please bear with me.)

How did Everyman lead me to think about memory? The play teaches an important lesson that I wasn't ready to receive as a 21-year-old: everything we have will be stripped away eventually. Money, friends, family, health - - Everyman relies on each to pull him through his existential crisis, and none of them do the trick. (If you've read the play recently, you probably realize I haven't read the play in a long, long time. This digression is all about my memory of my reaction when I read it 26 years ago in Craig Kallendorf's class.) In the 1980's, in the United States, the average 21-year-old white male was still in a phase of life that involved far more gain than loss: I was still gaining new experience, knowledge, and skills so that I could “begin” my career. Being told by a medieval morality play that everything I was working towards would be taken away from me was not a welcome message at all! My strong denial stuck with me, for some reason, and I found that as I lived my way through my twenties and thirties and forties, I gradually came to understand and accept the wisdom of Everyman. Seeing the slow physical deterioration and death of loved ones; gaining and losing some truly wonderful friends through career moves and misunderstandings and missed connections; witnessing unexpected losses of life and property among my peers; getting and losing jobs and houses and money as time and chance happened to them all: these taught me that yes, Everyman was right. It's all temporary.

(Still no woodworking! But just another paragraph or two, I promise.)

Memory is something I treasure, now that I have lost some people and places I love. As I cooked Thanksgiving dinner, I thought of all the people I've shared Thanksgiving dinners with. Many of them are no longer in my life. Time and chance does that. As long as I have memories, though . . . but guess what? Memory can be stripped away too. Alzheimer's is in my family, so there's a chance I'll lose my cherished memories. And even if I don't, remember Roy Batty's dying monologue in Blade Runner? “All those moments will be lost in time . . .” So this Thanksgiving, I am thankful for memory.

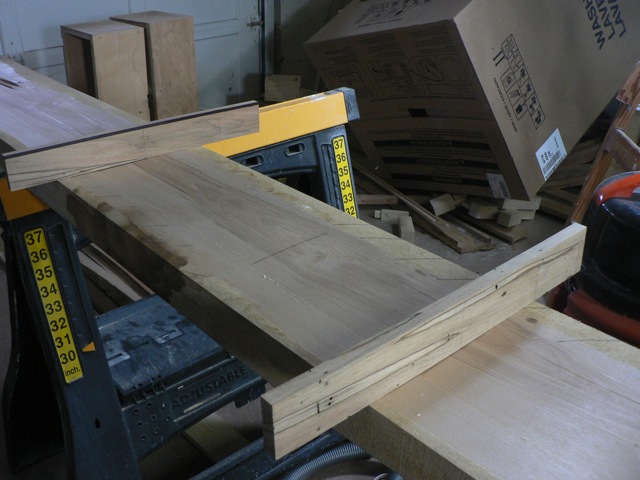
However, loss of memory has at least two sides. Early this month I was in Wisconsin, in the patch of woods I own. I knew that I had carefully stacked and covered some walnut boards there, about 15 years ago when I still lived in Iowa and had just bought the place in Wisconsin. A friend in Iowa gave me a small walnut log, which I split into quarters and then cut into quartersawn boards on a bandsaw. Every once in a while through the years, I have passed the covered stack in the woods and thought to myself I ought to bring the lumber home and use it. This fall I took action. And what a treat! The stack was in very good shape. I had covered it with pieces of steel roofing to shed water, and I think the fact that the cover overlapped the pile by quite a bit was what saved it.


The wood in the stack was all in good shape! Let's hear it for well-made piles!


And then I found the gift that I had given myself: inside the pile, a couple of pieces of crabapple. 


They aren't big, they aren't the best quality, but I had assumed that all the crabapple I bandsawed back in Iowa had been lost or burned. Apple is one of my very favorite woods. Hard, heavy, fine-grained, and with a glorious color that just keeps on improving with age, like cherry's older, more sophisticated sister. Finding these pieces of wood, probably only big enough to make a couple of tool handles or drawer pulls, was like a small gift I had given myself thanks to forgetfulness. This Thanksgiving, I'm thankful for forgetfulness.


2012-09-22

Dovetails by Hand


This blog is supposed to be about “woodworking on a less than infinite budget,” but so far I've been neglecting what I think is the real heart of frugal woodworking: using hand tools. In fact, I would guess that the most lavish thousand-dollar shop possible would be an all hand tool shop equipped with used (and some vintage) gear. 


I was thinking about this last Saturday as I taught my hand-cut dovetails class at Highland Woodworking. You don't need much gear to cut dovetails, and the difference between mediocre and Krenov-quality dovetails has far more to do with technique and practice than equipment. What do you need to cut dovetails? Some marking tools, a saw, a hammer and a couple of chisels. Throw in a way to hold the work still and a place with decent light to work in, and you're all set. Even if you think you'll do most of your woodworking with power tools, you need all those anyway, with the possible exception of the dovetail saw.


Sharp saw, sharp chisels, sharp eye, and practice: these are what it takes. How do you practice? Mark a knife line, split it with the saw, and remove the waste. That's all of woodworking in a nutshell, isn't it? Mark a knife line, split the knife line, remove the waste.

2012-08-26

Lights! Camera!


For several years I had two borrowed photographic light stands in my shop. I used them for taking photos, holding up backdrops, and sometimes as task lighting for things like sanding or finishing where a raking light at just the right angle is necessary for the best results. Then last month I had to return the borrowed stands, and realized I didn't want to shell out the money for this. Which is just for the stand, mind you, not this too.

So, until I can afford to splurge on that kind of gear, I decided to jury rig something out of stuff I had on hand. My “jury rigs” have a way of lasting for years, so whatever I made needed to be fairly durable and it had to work well. With a bit of head scratching and a couple of false starts, I came up with this, which I'm pretty pleased with:


Keep reading to see about the process of building it. If you don't want to click through and read, here's one key nugget of information buried back in there: the screw on a standard tripod head, and the corresponding threaded hole on the bottom of your camera, is just plain old 1/4-20. (At least, here in the U.S. I can't speak for Europe or Asia)

2012-06-24

Sharpening with Sandpaper


I have said elsewhere that sharpening on sandpaper is the cheapest way to start sharpening, and the most expensive way to continue. That's because you can scrounge up what you need to make a razor-sharp edge on a chisel or plane iron for well under $20. But then the sandpaper wears out pretty quickly, and it retails for around a dollar a sheet. Even if you find it for 50 cents a sheet in bulk, compare that to a $30 water stone that lasts for a couple of decades, and you'll see what I'm saying.

So why bother? Like I said, it's the cheapest way to get going, and you can spend just a little bit to get sharp tools for your first few projects, and then invest in more permanent equipment later on. The cheap honing guide I recommend for beginners will work on water stones or diamond plates as well. And even though I own a set of great water stones, I still use sandpaper when I'm out on an installation and don't want the mess, or the risk of theft or breakage, that go along with using water stones outside my own shop. And wet or dry sandpaper is good for flattening water stones. So when you get additional sharpening gear later on, you don't have to fret about wasting money on sandpaper sharpening.


2012-06-17

Sharpening: Extra Coarse


I learned this trick from Mark Duginske a couple of years ago: drywall mesh is great for flattening plane soles. It's also great for flattening water stones. So I wondered to myself: would it also be good as the very coarsest sandpaper in the “Scary Sharp” method? Turns out the answer is “kinda, sorta.”

I'll backtrack a little in case any of this is new to you. Here's a picture of drywall mesh:

You can find it in the big box home stores in the same area as the drywall tools, tape, and joint compound. It is coarse, and the mesh structure lets sanding dust (or iron filings) fall through so the mesh can keep cutting. In drywalling, it's used after you've taped and mudded, to quickly get the surface ready for paint. As you can see from the photo, it's die cut into a tabbed shape to fit a special holder with a handle.