2012-05-13

35mm hinge boring jig . . . without a drill press

The easiest way to bore holes for 35mm hinges (a/k/a cup hinges, concealed hinges, or Euro hinges) is with a drill press, and one of my other posts shows a great drill press jig for making sure all your hinges are in consistent locations. A drill press is great to have, and I think it's one of the first machines you should get, BUT it might not be something you buy with the first $1,000 you spend on woodworking equipment. Most of us will want a tablesaw or bandsaw, a router, and perhaps a planer first. 

The 35mm hinge is the standard for kitchen cabinets because it's affordable, it's durable (if you buy a good brand), and most of all, it's adjustable, so that when you put the door in place and it's not quite parallel with its opening, or a bit higher than it's supposed to be, you can adjust it with the turn of a couple of screws, while the door remains in place.

The hinge fits into a hole of 35mm (1-3/8") diameter about 12mm (1/2") deep, bored in the stile of the door. The hole is best bored with a "forstner" bit, or other bit that leaves a flat-bottomed hole, since you don't want the pilot of a spade bit or auger bit to poke through the face side of the door. And forstner bits are notoriously tricky to use with a handheld drill, especially in larger diameters, because of their extremely short pilots - - the very feature that makes them good for this job. So what to do, short of going out and buying a drill press?

Give this jig, or one like it, a try. It's simply a good, thick slab of flat material with a 35mm hole bored in it.* Actually, the hole in this one is 1-3/8", but that's close enough for Euro hinges, just a hair loose but it works fine.

If you're going to use it with a handheld drill, the jig needs to be at least as thick as the body of your forstner bit, plus the pilot, so probably around 3/4" thick. If you're going to use it with your router and a pattern cutting bit, the thickness needs to be enough to let the bit spin freely while the bearing is low enough to follow the edge of the hole. So if the cutting length of the bit you're using is 1", you should use a jig around 1-1/4" thick. The one in the photos is 1-1/2" thick, which is a bit too thick for the bit I used, as you'll see.


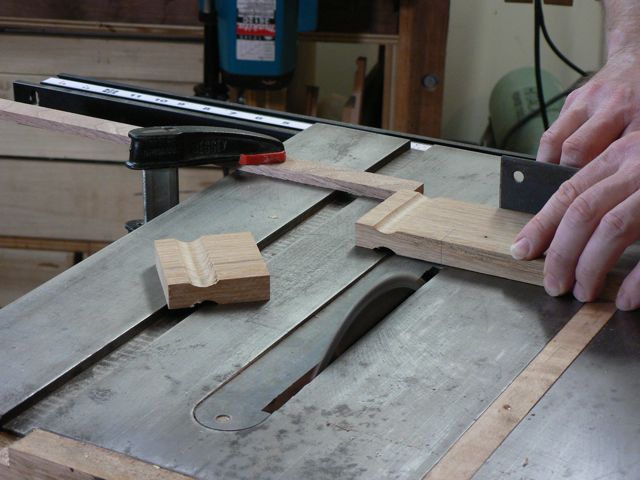
Position the hole so that it's around an inch in from the long edge of the jig. That will leave room for a fence, which will determine the distance between the edge of your door stile and the hinge hole. This distance is critical for determining how much your door overlays its opening. In the next photo you can see the fence, which is made of nice straight wood that's thinner than any door I'll ever bore with this jig:


The fence is positioned to put the edge of the hinge hole about 3mm in from the edge of the door stile. This distance works great for the hinge I use most often, Blum's Clip-Top 120.

Using the jig is simple: clamp it down where you want your hole, carefully put the drill bit into the hole, spin it up to full speed before it hits wood, and drill until you're deep enough. The sides of the hole in the jig keep the bit square enough to the stile for your purposes.


(Safety notes: you see those safety glasses on the bench? Those are extras. I was wearing mine but you can't see them in the picture. For real! Safety glasses aren't optional when you're drilling a big hole. Also, you nitpickers have already noticed I need to replace the power cord on this drill. This is a 5-minute job and will be the subject of a subsequent post, because most power tools need a new cord every few years.)

Here's the resulting hole:


You can also use this jig with a plunge router and a pattern following (bearing above cutter) bit:


Notice that the jig is thick enough for the bit to spin freely (not cutting wood) while the bearing is low enough to be guided by the jig. This is important. On the other hand, with this bit I think a thickness of 1-1/4" instead of 1-1/2" would work better.


And here you see why: notice how the columns are bottomed out? I could barely plunge a hole deep enough for the hinge without starting to rub the bottom of the collet on the jig.


Using this jig with the plunge router is easy. Clamp jig to workpiece at a comfortable height, plunge bit to within 1/8" of workpiece surface, turn on motor, and rout around and around the hole while gradually plunging to the full depth of your hole. Most pattern bits aren't designed to plunge straight down to full depth, so you have to keep moving the router and let the side of the bit do the cutting instead of the end.


Routed hole on the left, drilled hole on the right. The routed one is slightly cleaner and doesn't have the dimple in the middle from the drill pilot - - but all this is covered up once the hinge is installed. The router takes about the same amount of time as the drill, but throws the dust around more violently (and grinds it finer). 


*I hear the objection: how can I make this jig if I don't have a drill press? I have several suggestions.
1) make friends with someone who has a drill press, and show up at their house with your prepared jig stock, the 35mm bit you'll use to bore your doors, and an appropriate gift.
2) buy this jig from me. Oops, sorry, my son asked if he could have it. I'm not sure why. 
3) pay me to make a new jig. Oh, did I just say that? I guess I could. I'm kind of busy, though.
4) make your jig out of mdf, like I did. It cuts like cheese. Try your hand at using the forstner bit freehand. Your first try won't go well. Your second try might go better. Once you finally get a sort of clean hole (typically, they have messy beginnings and neat endings, the opposite of love affairs), use your best hole as a jig for making a better hole. Use that hole as the jig for making this jig.
5) buy a 1-3/8" spade bit, a good one with spurs on the edges, and use that to make the jig.
6) buy a 1-3/8" hole saw, and use that to make the jig. (Note: I don't know if this will work. Just an idea. The resulting hole might be way too big!)

2012-04-22

Drawer Pulls


As I draw near to completing this little storage cabinet for my shop, I'm taking care of details. This weekend I realized that I'm about ready to install the drawer faces, but didn't have pulls yet.

I've used a version of these pulls on other furniture built for myself, and find them quite practical. They're easy to grip, they're friendly to the hands, they don't stick out enough to hurt you as you walk by. And they're free! I won't go into lots of details here, just show you some photos of making them.

They're made from white oak that's 5/8” thick and 2-1/2” wide. I think if I were doing these over again, I'd go for 1/2” thick stock, but I had a bunch of 5/8” left over from making drawers and it was on top of the pile.
Hard to tell in this photo, but I'm using a following block to make it easier to hold the pull blank square to the fence.


Rounding over with a 1/16 radius makes them friendly to the hand and resistant to splintering. I shouldn't have done the rear of the pull, where it will be inside the mortise in the drawer front, because now there's a tiny gap to amuse the nitpickers.

Hopefully when I install, I'll keep the end grain lined up consistently from piece to piece.

The mortise in the drawer face is cut almost completely by hand, then finished with the router and a pattern bit.

At the end, you see them mocked up on the walnut drawer faces they'll be glued and/or screwed to when installed for good. I'm not sure about the white oak/walnut contrast, though I don't think it will look bad when the finish goes on. My approach in making these shop cabinets has been to use whatever material I have on hand as often as possible. This year, that has meant white oak, walnut, and wormy maple, with birch countertops. Next year it will probably mean thick, bluestained pine.


2012-04-02

Mounting Euro Hinges: a no-dollar drill press jig


Cup hinges, 35mm hinges, Euro hinges, concealed hinges, whatever you call them they sure make door installation easier. Compared to anything else, getting all the doors to line up parallel with each other is far easier with a cup hinge!

Here's a quick tip on how to bore the holes consistently, door to door, so that when you go to install you can slap on the baseplate, drive the screws, and pop on the door.

You'll notice I use a drill press. Perhaps a drill press wasn't in your $1,000 budget? I think it should be something you consider having when you start out, and if you find that woodworking is for you and you'll do it forever, definitely get a drill press. Even a benchtop model, if it's half decent, will be useful to you in many, many ways.

If you don't have a drill press, you could just as easily make yourself a similar jig for spacing the hinges in from the end of the door, and bore the hole with a handheld drill (or better yet, the router with a pattern bit!).

The first thing to determine is the distance from the edge of the door to the edge of your hole. Varying this will vary the amount of overlay your doors have when you're done. Please, as always, at least glance at the spec sheet for your hinges, and then test out the idea on scraps before you commit to hole placement on those doors you've lavished with so much hard work!

On this drill press table, the flip-stops on the fence are meant to be the same distance from the center of the bit, so that the holes at the ends of the doors are symmetrically placed. If you have more than 2 hinges per door, vertical placement of the other holes is not critical and doesn't need to be consistent, as long as you don't put a hinge right where a shelf has to be. During installation, just install the two end hinges, then clip the baseplate to the other hinges, close the hinges, and screw the baseplates to the face frame wherever they fall. Automatic fit.

I'm going to let the pictures do the talking for the rest of this entry.


2012-03-18

Drawer Slide Installation

I spent the weekend chauffeuring my 14-year-old to anime conventions, haircuts, pet shops, etc. In between chauffeur runs I worked on installing drawers in my shop cabinets. And I used this "jig" to do it.

The first time you mount a drawer on metal slides (a.k.a. runners), and see the intricate way the slides have been manufactured, and all the tiny little numbers on the specification sheet (some of them in millimeters with Euro hardware), you might think you need to buy a $30 jig that helps you drill the screw holes in the right places.

That jig might work just fine, and people I deeply respect say good things about the Rockler jigs for installing hardware, but I'd rather save my $30 for something else, and save the space that jig would take up in my very small shop.

What's the alternative? I show one possibility here: a piece of sheet material from the scrap bin. As long as it's wide enough to support the drawer slide, and its two sides are parallel so the slide will end up level inside the cabinet, it can work as a fine drawer slide installation jig:

As you see, I simply lay the slide down on the top edge of the jig, position the front edge of the slide 5/32” back from the front edge of the cabinet using my adjustable square, and drive some screws. 

Move the jig to the other side (it's double sided! ambidextrous! unhanded!) and install the other slide, which automagically ends up at exactly the same height! There you go: your drawer will be perfectly level inside the cabinet.

What if I don't know how tall to make the jig?
I was hoping you'd ask that. Use this as a chance to learn: make the jig close to what you think is the right height, install the slide and drawer, and see where the drawer is compared to where you want it. If it's 7/16” higher than you want it, make the jig 7/16” shorter and reinstall the slide. Chances are the screw holes from your first try will be covered. If they aren't, and somebody actually sees these screw holes, and then cares enough to ask about them, just roll your eyes, sigh, and ask "What's your problem with green woodworking?"

What if the jig is too short?
Say it's 2” too short. Find a long scrap 2" wide, and put that under the jig.

What about the next drawer?
Cut the jig shorter, and use it again.

What if I'm building face-frame cabinets?
Use a jig like this to install the blocking you use for installing the slides. You know, the blocking that kicks the drawer slide out from the cabinet side so it's flush with the inside edge of the face frame. Then use the jig (or one like it) to install the slides.

No more questions tonight. Well, maybe just one.

I really love this idea, and I want to beat it to death. How can I go about doing that?
Let's say you have a run of cabinets which have several drawers in each cabinet, all at the same heights. Make yourself a set of these jigs that stack together. Number them 1, 2, 3, 4 so that you always put them in the cabinet in the same order. Stack them all up, screw on a drawer slide, take off the top layer, screw on another slide, take off the next layer, etc. 

2012-03-11

File Tip for Screw Tips

If you've used pocket screws for very long at all, you've probably run into this problem once or twice: the screw pokes out the other side of the workpiece you're fastening to. Most times this problem is felt before it's seen: you're moving an assembled case down from your bench, one hand slides along the corner and OUCH!!!! you've torn a chunk out of your hide. Hopefully you haven't left a bloodstain where it will show.


I was going to say the three main causes of this problem are 1) a void under the screwhead which lets the workpiece you've bored collapse as you drive the screw, 2) inadvertently boring a little too deeply, and 3) setting the clutch on your drill/driver for too much torque, so the drill keeps driving the screw even after it's reached the bottom of the pocket.

I'm not so sure about reason number 3, but after today I'm adding reason 4 to the list: workpiece thinner than specs! I was getting ready to install drawers in this case, and just to double check my calculations I measured the height inside the case. It was a bit over 1/8” taller than it should be, meaning that the plywood top and bottom were a hair over 1/16” thinner than the nominal 3/4”. We're used to seeing hardwood ply 23/32 instead of a full ¾, or 24/32, thick. This ply is 21/32! I would have been much better off setting my boring depth for a 5/8” workpiece rather than 3/4”, which is my habit when I'm building cabinets. It may be time to change that habit.

So how to save the situation? Something I have tried that doesn't work is just sanding it down with my random orbit sander. Trust me, don't do it. The replacement backing pad for my old Makita sander was $15. One choice would be, take the cabinet apart, bore new shallower pocket holes, and reassemble the cabinet. Another would be to remove the offending screw from its hole, use wirecutters or a grinder to make it a little shorter, redrive the screw, and fill the hole if it shows. I think this is the way to go if the screw has poked out through a surface that will show in the finished product. Here, though, the screw poked out a cabinet side which will be hidden when the cabinet takes its place in the middle of a run, so I took a quicker approach: I filed it down.


Use a big, flat file. I used a 12” mill file for this job. Hold the tip of the file flat on the surface you're flushing the screw tip to as you file. Note the tape wrapped around the tip of the file. This is the key to this trick. The tape stops you from scratching the cabinet side with the end of the file (which usually has a pretty big burr), and it stops you from filing down the whole side of the case when the screw is flush. Also note that I've added a wooden handle to the file's tang. You can buy these handles, or you can make your own with scraps, which is what I do. Just shape a scrap of solid wood so it's comfortable to hold, drill a hole that's a snug fit for the tang, and pop it on with a few hammer taps. The palms of your hands will thank you.


Pocket screws are hardened, but they're still just a tad softer than the file. It makes a terrible shriek for the first couple of strokes, but after that it's not so bad. Every couple of strokes, clear away the iron filings so you don't smash them into the wood where they'll give you trouble later.

 In the final picture, you can see a silver dot, which is the newly flattened end of the screw. It's flush with the side, and will be hidden against the side of the next cabinet over once I install these. There's a small possibility that if I use a water based finish on the cabinets, it could cause a rust stain, but I'm not worried because I'll be sealing these with shellac before the acrylic goes on, and again, it will be out of sight once installed.


2011-01-30

January 23: Loading the Kiln

7 or 8 years ago, my friend Reed and I built a solar kiln at his farm in Jasper County. It's a fairly simple structure that heats air in a passive collector, and moves the hot air through a pile of lumber with a couple of attic fans powered by photovoltaic cells. We found that it does a good job of drying lumber, and for the first couple of years it was standing, we usually had something or other drying in it. Life being what it is, various events in both our lives kept us from drying lumber for a few years, but with the new year, Reed decided to fire up the kiln again. We both have enjoyed using the lumber we dry, and we've also enjoyed selling some of our stuff to other woodworkers.

Last weekend, our sawyer at Champion Lumber in Shady Dale, Georgia, called to say he had a trailer loaded with pine he'd cut for us. I took the boys out and we spent most of the day loading the kiln.
All smiles as the hard work begins. They look like Stepford sons, don't they? If only. 

As the layers rise up, the guy in the kiln gets mighty warm. With the doors closed, we've recorded temperatures up to 160 degrees in this thing!

Most of the lumber we loaded into the kiln looked like this: wide, clear boards. Barring weeks of cloudy weather, this load (mostly 5/4 thick) should be ready sometime in April. After that, we have another load worth of 6/4 and 8/4 that looks just as beautiful!

 By the time the stack reaches the bottom of the air baffle that houses the fans, the inside guy barely has room to get out of the kiln. We think we put about 1200 board feet of lumber in last weekend. Stay tuned to see how it turns out!

2010-11-25

Who Am I? Why Am I Here?

I’m Jim Dillon. I work at Fernbank Science Center in
Atlanta as a cabinetmaker. I build and repair exhibits,
cabinetry, and teaching aids there. I teach occasional
woodworking classes at Highland Woodworking. I have also
been a freelance writer, a college English teacher, and a
warehouseman.

A list of the trades I’ve worked at doesn’t really add up
to an answer to the question “Who am I?” But perhaps if
you read more of what’s here, and I write it well enough,
you’ll figure me out. For now, let’s assume that since I work
wood, teach people how to work wood, and explain stuff
on a professional level, I’m qualified to write a blog about
woodworking.

Why am I here? More to the point, why am I writing this
blog and why should you read it?

I call this blog “The Thousand-Dollar Shop” because I want
to encourage you to just buy a few basic tools and get
going. If you inventory the stuff you see and hear about
in here, it’ll be obvious that I have more than a thousand
dollars invested in my gear. But it certainly didn’t come in
one lump. I’ve gradually picked up this and that as I needed
it. As of today I’ve been accumulating woodworking tools for
about 25 years, and I won’t try to hide that from you. But
I am absolutely sure that if you can scrounge up a circular
saw, a drill, a few clamps, a pocket hole jig, and some
sandpaper and glue, you can make yourself a perfectly fine
bookcase.

DO IT! If you’ve been thinking it would be cool to make this
or that for yourself, but you’re intimidated by all the gear
you see in those shops on tv, or by all the skills you hear the
preening website experts bragging about, listen to me: you
can make perfectly fine stuff without all that. Try a project
or two, start small, and build from there. It works! It’s what
I did when I graduated from college and wanted a bookcase
and saw I couldn’t afford a good one.


That’s why I’m here: to encourage you to have a try at it.
And to show you how to do it without going into debt. And to
show you how much fun it is.