
I have
said elsewhere that sharpening on sandpaper is the cheapest way to
start sharpening, and the most expensive way to continue. That's
because you can scrounge up what you need to make a razor-sharp edge on a
chisel or plane iron for well under $20. But then the sandpaper wears
out pretty quickly, and it retails for around a dollar a sheet. Even
if you find it for 50 cents a sheet in bulk, compare that to a $30 water stone that lasts for a couple of decades, and you'll see what
I'm saying.
So why
bother? Like I said, it's the cheapest way to get going, and you can
spend just a little bit to get sharp tools for your first few
projects, and then invest in more permanent equipment later on. The
cheap honing guide I recommend for beginners will work on water
stones or diamond plates as well. And even though I own a set of
great water stones, I still use sandpaper when I'm out on an
installation and don't want the mess, or the risk of theft or
breakage, that go along with using water stones outside my own shop. And wet or dry sandpaper is good for flattening water stones. So when you get additional sharpening gear later on, you don't have
to fret about wasting money on sandpaper sharpening.
This
method is also called “Scary Sharp” by the online woodworking
community. The name Scary Sharp goes back to rec.woodworking on
usenet, back in the early 1990's. If you're curious about the
history, I think there's even a Wikipedia entry on Scary Sharp that
includes links to the earliest known appearances. Makes me feel
grownup (or old?) to say “I was there.” I used to lurk, and
occasionally post, on that forum, as I was teaching myself how to get
good results from hand tools.
On to
the show.
Get
something flat and rigid. It can be a piece of glass 3/8” thick or thicker,
or some granite, or even a scrap of 3/4” mdf. In these pictures I'm using a scrap of granite countertop that's about 1-1/4" thick. I have some for sale if you're interested. Whatever flat thing you use should be at least
as large as a sheet of sandpaper torn in half lengthwise, so let's
say 4-1/2” x 12”. Since my flat thing is granite, I'll refer to it as a "stone" for the rest of this entry.

Tear a
sheet of sandpaper in half, lengthwise. The grit should be somewhere
in the 180/220 range. Use spray adhesive to mount the sandpaper on
one or both faces of your stone, rough side facing outward. The
optional, bottom sandpaper will help keep your stone from
skidding around on your workbench. The top sandpaper is to immobilize the paper that actually does the sharpening. You don't sharpen
with it. One mistake people make with this system is to think they
have to glue each grit of paper down separately. This makes for a lot
of unnecessary fussing and mess, because you have to replace the
paper so often. You also end up needing a piece of glass or granite 3 feet long, plus a work surface big enough to hold it. Not practical for most of us!
Get a
sheet of sandpaper in each of the following grits: 80, 120, 180, 220,
400, 600, 800, 1200, 1500, and 2000. The preferred type of sandpaper is
silicon carbide, which is black, and is usually sold as “wet or
dry.” For the finer grits you may have to go to an auto body supply
store, or Amazon, or order through Klingspor.
Rip
the sheets in half lengthwise, and make yourself a nicely organized
stack so that you can flip through the grits in order, roughest to
finest.
Find a chisel or plane iron that needs sharpening. These photos show me sharpening a couple of old beater chisels from the tool bucket I keep in my car. The first thing to take care of is the
back of the tool. Put the 220 grit half-sheet on top of your stone and lay the tool on top with its back held flat against the
sandpaper. You don't have to do the entire back, just an inch or so, to be sure you're registered securely flat on the
surface. Rub the back along the length of the sandpaper a dozen times
or so, pressing down hard, and then check your work. If you have a new pattern of uniform
scratches along the edge of the tool, you're ready to move to the
next finer grit. If you don't, evaluate how much work needs to be
done. If it's a lot, go down to a coarser grit. Usually a new tool
only needs a few strokes on the 220 grit to be ready.

In the photo above, you can tell I'm pressing hard because of the whiteness of my fingertips. You can also see I've got a thumbscrew tightened down in the minitrack on my workbench. This keeps my stone still.
Work
your way up through to the finest grit. After the first one, only
work long enough with each grit to eliminate the scratches from the
previous grit. By the time you get to 1200 grit the surface will be
pretty shiny; by the time you get to 2000 grit it will be mirrorlike.
And it's fast! Here's how the back of this old chisel, which has some rust pits, looks after 1500 grit:

And here's a picture of how close to a mirror this chisel back was after 1500 grit. With my autofocus camera it's hard to focus on the reflection rather than the chisel, but what you're seeing is one of the fluorescent tubes above my workbench, reflected on the back of my chisel:

Once the back is flattened and polished, work on the bevel. If you want, go freehand. I recommend that
beginners use an inexpensive honing jig like this one. To begin with,
set the tool in the honing jig so that it's being sharpened at the same
angle as it is now. You can experiment with new angles later. Gently tighten the jig with a screwdriver - - don't overdo it, just make it firm so it won't slip on its own.

Put
the 180 grit half-sheet on top of your stone and roll the jigged
chisel or plane iron along its length. Press down as you pull back,
but not when you move forward. This will prevent you from cutting
through the sandpaper, something you don't want to do. Make a dozen
or so strokes and check your work. Is the jig set at the proper
angle? If not, adjust. If so, continue until you have a uniform
pattern of scratches right up at the cutting edge.
Once
you've got it done at 180 grit, running up through the grits should
go very quickly, with only a couple of dozen strokes needed at each grit. When you're done with 2000 grit, remove the tool
from the jig and very carefully remove the burr by laying the tool
down with its edge off the stone, and gently drawing it backward.
If
you've done it right, you now have a razor-sharp edge. Careful! Put
something on to protect it from rust, put your sharpening stuff away,
and get to work.
FINE
POINTS:
ONE: It's
wet-or-dry sandpaper. Try working wet. Use a spray bottle full of
water plus 2 drops of dish detergent. Don't drench it, just put a
fine mist on the paper before you begin, as shown in this photo:
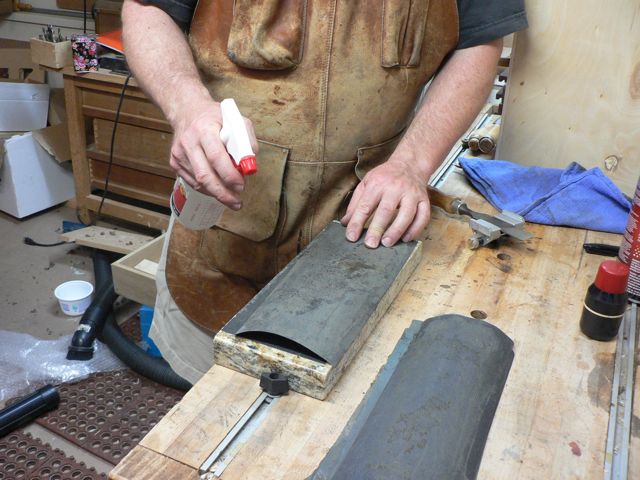
As you can see, I'm using such a small amount of water that none drips down onto my benchtop. The paper now cuts faster,
stays cleaner, and lasts longer. The downsides are that this makes
quite a mess, especially of your fingers, and your tool must be protected against rust
IMMEDIATELY after you hone. Also, don't use water if your sandpaper
is not waterproof, or if you're using mdf, melamine, or phenolic
board, as your stone. These all swell when exposed to
water.
TWO: An easy way to tell whether you're working on the bevel at the appropriate
angle is with a Sharpie marker. Color the entire bevel black:

Then
make a single stroke on the sandpaper and check your work. If either
the whole bevel, or an area in its center, is now erased, you're
working at the right angle. Here's what it looks like if the angle is too high, that is, if the jig is too close to the edge of the chisel:

Since that bright area isn't a perfect rectangle, the old edge of the chisel wasn't perfectly square to its sides. In the next picture you can see that the bright area is both at the cutting edge and at the rear of the bevel. This is because the chisel was previously hollow-ground on a grinder. Since I'm straddling that area with the angle I'm using, I can be confident I've got the jig set correctly:

And that's basically it. Once I'm done I set my heavy granite stone on top of the sandpaper, to press it flat as it dries.
Note: I have some of these granite scraps for sale. I'm selling them for $15 plus shipping. The colors are random, I make no guarantees about the squareness or precise size or precise flatness, just that they're big enough for half-sheets of sandpaper and flat enough to sharpen with. If you'd like one, send me an email and we'll get it done. (U.S. and Canada only).


No comments:
New comments are not allowed.