2012-04-22

Drawer Pulls


As I draw near to completing this little storage cabinet for my shop, I'm taking care of details. This weekend I realized that I'm about ready to install the drawer faces, but didn't have pulls yet.

I've used a version of these pulls on other furniture built for myself, and find them quite practical. They're easy to grip, they're friendly to the hands, they don't stick out enough to hurt you as you walk by. And they're free! I won't go into lots of details here, just show you some photos of making them.

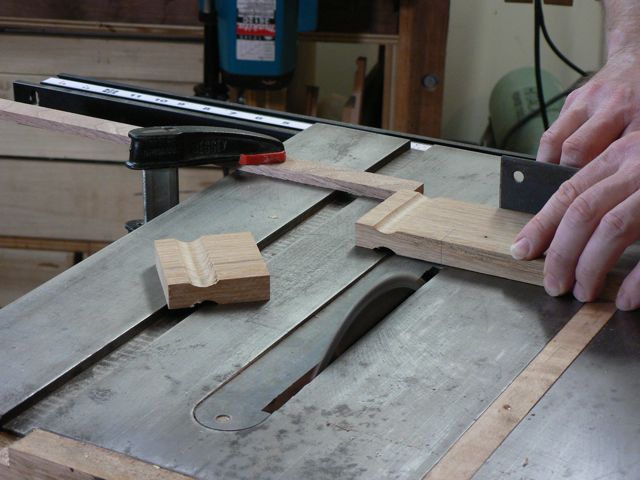
They're made from white oak that's 5/8” thick and 2-1/2” wide. I think if I were doing these over again, I'd go for 1/2” thick stock, but I had a bunch of 5/8” left over from making drawers and it was on top of the pile.
Hard to tell in this photo, but I'm using a following block to make it easier to hold the pull blank square to the fence.


Rounding over with a 1/16 radius makes them friendly to the hand and resistant to splintering. I shouldn't have done the rear of the pull, where it will be inside the mortise in the drawer front, because now there's a tiny gap to amuse the nitpickers.

Hopefully when I install, I'll keep the end grain lined up consistently from piece to piece.

The mortise in the drawer face is cut almost completely by hand, then finished with the router and a pattern bit.

At the end, you see them mocked up on the walnut drawer faces they'll be glued and/or screwed to when installed for good. I'm not sure about the white oak/walnut contrast, though I don't think it will look bad when the finish goes on. My approach in making these shop cabinets has been to use whatever material I have on hand as often as possible. This year, that has meant white oak, walnut, and wormy maple, with birch countertops. Next year it will probably mean thick, bluestained pine.


2012-04-02

Mounting Euro Hinges: a no-dollar drill press jig


Cup hinges, 35mm hinges, Euro hinges, concealed hinges, whatever you call them they sure make door installation easier. Compared to anything else, getting all the doors to line up parallel with each other is far easier with a cup hinge!

Here's a quick tip on how to bore the holes consistently, door to door, so that when you go to install you can slap on the baseplate, drive the screws, and pop on the door.

You'll notice I use a drill press. Perhaps a drill press wasn't in your $1,000 budget? I think it should be something you consider having when you start out, and if you find that woodworking is for you and you'll do it forever, definitely get a drill press. Even a benchtop model, if it's half decent, will be useful to you in many, many ways.

If you don't have a drill press, you could just as easily make yourself a similar jig for spacing the hinges in from the end of the door, and bore the hole with a handheld drill (or better yet, the router with a pattern bit!).

The first thing to determine is the distance from the edge of the door to the edge of your hole. Varying this will vary the amount of overlay your doors have when you're done. Please, as always, at least glance at the spec sheet for your hinges, and then test out the idea on scraps before you commit to hole placement on those doors you've lavished with so much hard work!

On this drill press table, the flip-stops on the fence are meant to be the same distance from the center of the bit, so that the holes at the ends of the doors are symmetrically placed. If you have more than 2 hinges per door, vertical placement of the other holes is not critical and doesn't need to be consistent, as long as you don't put a hinge right where a shelf has to be. During installation, just install the two end hinges, then clip the baseplate to the other hinges, close the hinges, and screw the baseplates to the face frame wherever they fall. Automatic fit.

I'm going to let the pictures do the talking for the rest of this entry.