Recently it began sounding bad, and way too loud:
I took the wheels and axle off to isolate the motor and make sure it wasn't something caught in the bushings the axle rides on, or the inside wall of the leather strop wheel where the motor shaft turns the whole works around. Nope, definitely a noise from the motor.
I wasted several
hours online looking through the various user forums to see if anyone had experience either repairing or replacing the motor. No first-hand accounts there, only rumors, and a few mentions by Tormek employees that these motors hardly ever fail. I priced a replacement motor. Ouch, $300 or so! For that much money I think I'd try to find a local motor shop to rebuild it for me. That motor is a stout little brute, weighing over 10 lbs. despite only being rated for 1.5 amps ("FLA" on the motor's tag).
For the sake of ticking off all the boxes before giving up and spending money, I tracked down the contact information for Tormek support in Sweden. Maybe there was a secret lifetime warrantee on the motor (nope). Maybe their shop has a pile of salvaged motors on hand, so I could get a cheap replacement (I don't know, I didn't find out).
Within an hour, Mats from Tormek support emailed me back. To summarize his message: these motors hardly ever fail. The noise you describe sounds like bearing failure. Sometimes moisture infiltrates a bearing and causes corrosion. Please send a video so I can hear the noise you describe.
So I sent the video above. Next morning, the answer came back: yep, bearing failure.
This was the first good news in the story so far. I have replaced several bearings on my 15" planer. I have removed bearings from the Frankensaw's various donors. I have a small wheel puller. How hard can it be?
Next stop, YouTube. I scanned several videos on replacing motor bearings. What I saw convinced me it was worth trying. One of the better I saw is from Mr. Pete 222 ("Your Internet Shop Teacher"). I've seen a lot of videos on that channel. Mr. Pete seems to be a retired high school metal shop teacher somewhere near Peoria in Illinois. They've got experience, knowledge, and a good simple approach to teaching. Yes, I recommend this channel.

Mr. Pete's video on changing motor bearings
Last week I had a session in the shop with my son, as he repaired an Ikea cabinet he'd found on the curb. During the pauses while he drove screws and didn't need my help, I took the motor off the chassis and removed the ends. Unfortunately I didn't take photos as I went, because of the distraction of having two projects going on in the shop at the same time. But what I found was encouraging. The bearings looked easy to reach. My wheel puller got the first one off without even needing to use a wrench to tighten it! The second one was too close to the windings for the puller to reach. I found, however, that a $10 "faucet valve tool" from the plumbing section at Lowe's reached in and did the job handily. I read the numbers on the bearings and went online. BINGO! the bearings are a very common size, available for $5 each including shipping.
The bearings arrived Thursday and I put the motor back together that night, photographing as I went, so You The Reader can see what the guts looked like. So here you go:


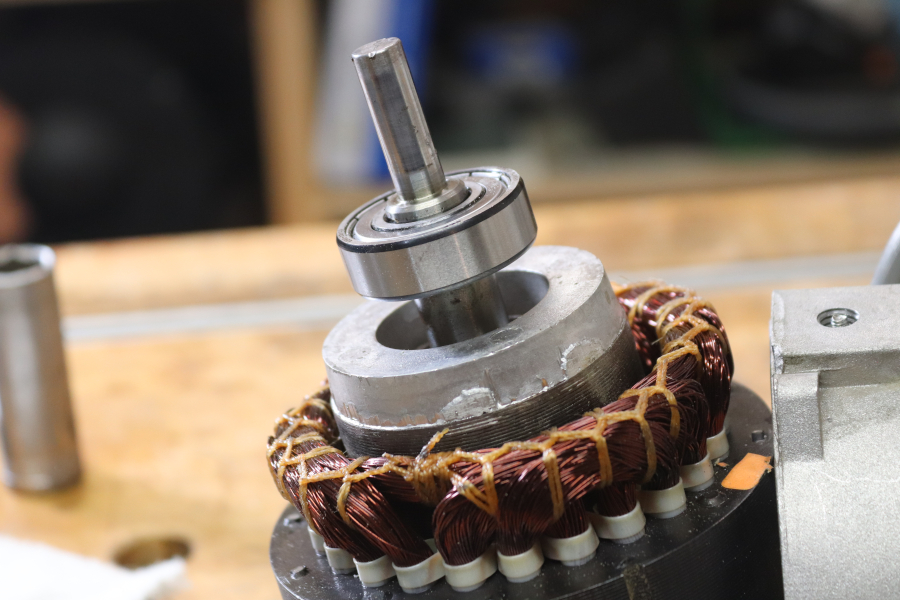


I didn't take any photos of the electrical connections of the switch (3 wires, simple) or the gross mechanical attachment of the motor to the chassis (these are simple, obvious, and readily discernible in the exploded parts drawing you can find online). I did have to replace a crimped-on lug for the ground wire in the switch, but again, that's trivial.
Sure, trivial, but it reminds me to remind you: here are some basic tools you'll need to do this job effectively and safely. None of these tools is dedicated to this job only, that is, they'll come in handy in other places:
-deadblow hammer(s)
-3/16" pin punch
-wire cutter and stripper
-assorted crimp-on electrical connectors (spades and rings and "u's")
-wheel and/or bearing puller.
Now indulge me in a little meditation on the Tormek. The first thing we talk about when we talk about Tormek is the price. (The second is how slow it is compared to a bench grinder.) It's expensive compared to the alternatives. However, when I had the motor apart I saw that both the capacitor and motor plate had manufacture dates of 1993. This machine is roughly 27 years old, and it has not been babied. I know it's on its second wheel (at least), and it's been used and abused in the process of keeping all of Highland's teaching tools sharp, plus sharpening the tools of the thousands of students who have passed through that seminar shop. Then I invested a measly $10 in new bearings and 3 hours of work, and it's ready to go back to the daily grind. I will replace the wheel again, and I noticed the power cable could use a refresh as well, but I fully expect this machine will last me until I'm ready to put all my tools down. I'm 55 now. I don't think it's unreasonable to let me retire at age 70, 15 years from now. So this expensive machine (I think they were around $600 back in the late 90's when I bought my first one), if amortized over my (theoretical) 42-year career, would cost $14.28 per year, not counting the replacement of wear parts like the stone, the stone truing tool, electrical cords, and yes, bearings. My point here is that for the extra money (compared to Machine X), you get the kind of engineering that allows for repairs and replacement parts.
Sure, I'm smug. In my thank-you email, I told the service department of Tormek that this is the sort of incident that gives me confidence to keep buying attachments for the machine. Chances are, I'll still be using it another 15 years. It feels like an investment, rather than an expense for consumable shop supplies.


No comments:
Post a Comment
This blog is not meant to be a forum for any and all viewpoints. However, I do welcome questions or comments that help clarify the information in my posts. I try to close comments after a few months, so if you have a question about an old post, please feel free to email me directly: spirithillwoodworks@gmail.com.